Reviews & articles for shooting sport enthusiasts.

Latest

S&K Scope Mounts – Drill and tapping? Not necessarily…

TPF’s Definition File: Bubba’d – A firearm which has been altered/modified from its original configuration, usually in a crude, unprofessional manner. Most common modification for such firearms are to have a cut down, sporterized stock which do not look professional. Mainly used in reference to older military bolt action rifles which no longer are “true to original design”.

Drilled and tapped Enfield

Drilling and tapping. While fully functional, can never be undone

Canada is home to literally hundreds of thousands of Lee Enfields and other classic military rifles which more often than not have been “Bubba’d”. Most military rifles in the World Wars did not have provisions for mounting any form of optics and those that were had armourers who took select rifles aside and reworked them into being able to accept a scope mount. While nearly all modern manufactured rifles have provisions for attaching scope mounts with factory included mounting holes, older rifles, such as the Lee Enfield have no such option. Many of these common Canadian rifles have indeed been “Bubba’d” by the amateur DIY (Do It Yourself) handyman and other than the sporterizing of a stock, the next most common modification is the installation of a drill and tapped aftermarket scope mount. There is a reason why firearms enthusiasts use gunsmiths for much of their customizing work, because a competent gunsmith has the proper tools, patience, and reputation to uphold in order to successfully complete a high-quality permanent alteration. Yes anyone with a hand drill and a set of taps can create and mount a scope mount, but how precise is it? Most gunsmiths have layout tools, dial gauges to ensure proper placement, and various precision machining equipment to ensure high quality work.

SK Prior

Scope mount on an Enfield... After rear sight removal the question remains...To bubba or not to bubba....

Enter S & K Scope Mounts, a company started in 1964 with a desire to provide mounts for specialty niche firearms market. That niche involved the plentiful, older military rifles and way of attaching and securing scope mounts with minimal efforts and no permanent alterations. S & K have an enormous listing of former military firearms which are able to have an “Insta-Mount” installed, be it a to mount optics in a standard mounting position (beside/over bolt) or a scout mount position (forward of bolt/on barrel). All available mounts are custom manufactured for each specific model of rifle and are generally available with an integrated weaver rail or provisions for S&K’s proprietary scope rings which will be metioned later in this write-up.

Some of the types of rifles which S&K manufacture Insta-Mounts for:

  • M-1 CARBINE
  • LEE ENFIELD #4 Mark 1 or 2 #5 British Enfield Eddystone
  • 1917 ENFIELD P14 or P17
  • #1 MK III LEE ENFIELD #7
  • 1903 SPRINGFIELD
  • M-1A /M14
  • M-1 GARAND
  • FN-49
  • RUGER MINI-14
  • 1898 30-40 KRAG & NORW
  • GERMAN M-43,  G-43
  • LARGE RING MAUSER 8mm, Yugo 48, 98K, Argentine, Turkish, Braz 7mm (Rec dia. 1.400)
  • SMALL RING MAUSER Swedish, 93,94,95,96,633,640,M38,Spanish (Rec dia. 1.3)
  • JAP. ARISAKA 7.7
  • HK-91 & HK-93
  • SKS TYPE 56
  • WINCHESTER 94
  • MAS 49/56
  • 98K – MAUSER SCOUT
  • 1891 ARGENTINE MAUSER SCOUT
  • BUDAPEST M95 MAUSER SCOUT
  • CARL GUSTAF MAUSER SCOUT
  • Finnish Mosin Nagant M-39
  • Finnish 1891 – Also Russian 1891, Dragoon, M24, M27, M28 Scout
  • MOSIN NAGANT 91/30 & 91/59 Scout
  • MOSIN NAGANT M44 SCOUT

Installation methods are usually straight forward with the removal of original iron sight hardware, and replaced with a drop in, machined scope mount which is tensioned into secure position. This means that there if the user of an S&K Insta-Mount were to keep all the original parts, he could return the firearm into it’s original form without leaving tapped holes and such which would destroy the historic accuracy of the firearm. TPF was , the able to acquire several different versions of these scope mounts for some of the rifles owned by members of the Canadian firearms community.

SK Enfield Mount

S&K's Enfield MK4 & 5, Insta-Mount Weaver Style

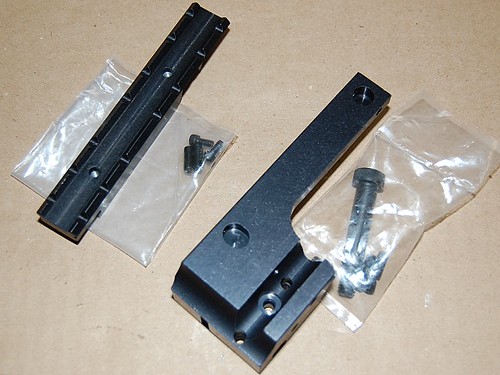
For this installment of TPF, we install the Weaver style Insta-Mount for a Lee Enfield Mark 4, No 1 Rifle. S&K does not use castings or extrusions or lesser materials for their products, instead they opt to minimize costs by using inexpensive packaging. Quoting S&K, “After all, do you want a nice package or do you want the best scope mount available?” Within the simple packaging of the scope mount was a serious looking piece of steel that was machined very nicely, all required mounting hardware, and a simple but thorough page of instructions. The mount, three screws and a wedge nut. It was time to begin.

SK Enfield Screw

S&K uses pre-existing holes

As per instructions the original rear sight was removed and the two small slotted screws were used to install the mount in the existing receiver holes. This is were a small snag occurred. On installation of the angled nut and the retaining screw, it was found that once installed, the bolt could not be installed due to interference between the bolt head and the bottom of the angled nut. The angled nut was removed, the bolt installed, and then the angled nut was re-installed to complete the installation of the S&K scope mount for the Lee Enfield. TPF tested the functionality of the bolt and found zero binding issues so the conclusion was that it will not effect usage of the rifle at all, but if bolt removal is desired, the S&K Enfield mount needs to have the wedge nut removed to do so. Maybe it was just a quirk or build up of tolerances in the specific rifle or a slight variation between a Mk 4 & Mk 5 Enfield, but for most people who use Enfields for hunting or other occasional shooting endeavours, it will be installed for years if not decades before even considering removal for any reason.

SK installed

Two pivot screws and a torqued wedge. Ready for rings in under 15 minutes..

With the slight glitch, it was less than 15 minutes from the receiver without the rear sight to having the S&K scope mount fully installed and torqued into position. After which the entire package was completed via a set of weaver rings topped off with a typical Bushnell scope was put into position. Total time elapsed was under 30 minutes using nothing but a flat screwdriver and an allen key. The S&K scope mount appears very secure, rigidly mounted and very robust in design. This specific mount featured a weaver pattern ring mounting system which is very widely used. Another option available is a proprietary style of scope ring mounts which were the start of the company. These “SKulptured Bases” as well as corresponding “Smooth and Kontoured Rings” are machined entirely from a blank of steel and because S&K claims that these are the world’s strongest scope mounts; they are guaranteed for life (beyond deliberate destruction).

Enfield Scoped

The final product. Scoped and ready.

SK installed2

Installed, with clean lines and can be restored simply

How much are gun-smithing fees to have your rifle drilled and tapped and the cost of a set of scope mounts? Are there even scope mounts available for your old military rifle? This is where S&K shines as they are dedicated for quality, simplicity and drill and tap free designs.

S&K’s Insta-Mount for the Lee Enfield Mk 4 & Mk5, as reviewed by TPF, is available directly from S&K at an MSRP of $65.00 USD. As always it is up to the readers to determine if S&K Insta-Mounts for ex-military rifles are Tactical, Practical or Fantastical!

S&K’s Contact information:
Website: http://www.scopemounts.com
Email: comments@scopemounts.com
Phone: (814) 489-3091
Toll Free: (800) 578-9862

Addendum: TPF will be reviewing more S&K scope mounts in the future, with some other common ex-military rifles available in Canada as well as utilizing their S&K proprietary rings.

SK Future

Mauser K98 scout scope mount (left), and an M1 Garand, offset scope mount.

Stay Tuned!

Reloading – Is it worth the cost?

Many people ask a common question, over and over. Is it worth it to reload your own ammunition? To those questioning individuals the proper response is, “That depends…”

That depends on a few factors:

  • Do you shoot center-fire ammunition?
  • How much do you actually save?
  • What sort of annual ammunition expenditures do you have?
  • How much is your free time worth?

Do you shoot center-fire ammunition?

Ammo-Comparison

Are reloads (left) cost effective compared to factory?

Do not laugh at the question. People, in their need to make things both cheaper and with their own hands have learned various methods for manufacturing rim-fire rounds. That being said however, rim-fire ammunition in itself is not-re-loadable to 99.99999% of those who shoot it. Center-fire metallic cartridges, used primarily in rifles and handguns have four (4) components; the primer, case, powder, the bullet. Modern shotgun ammunition has five (5) components; the primer, hull, powder, wad, and the load. For this report, only Boxer primer styles are being considered.

  • Primer: The source of ignition for ammunition. A small diameter cup which contains a chemical compound which is activated by a percussive force. The activation of this compound results in the ignition of a cartridge’s powder charge in an assembled cartridge.
  • Case: Metallic cylinder which houses the primer, powder and bullet. Usually constructed of brass and can be nickel-plated as well and manufactured from alternate alloys. Brass however is the material most used and reloaded.
  • Hull: Similar to a Case, but normally has a metallic base, with the sides being constructed with a polymer based material. Some hulls are completely metallic.
  • Powder: The high rate burning compound which when enclosed in a case and ignited by the primer, combusts. The resultant gases created from this combustion (pressure) are what propel the bullet or wad/load down the barrel of the firearm.
  • Wad: A compressible plastic piece which has two purposes. First to create a seal in order to allow pressure to develop under powder ignition. Secondly, the compression of the wad allows for a larger perssure to be developed before the kinetic transfer of energy to the load (slug or pellets). It is launched out of the firearm, but the lighter mass and design have it fall away soon after discharge.
  • Bullet: The projectile launched out of the end of the firearm.
  • Load: This can be a single projectile (slug) or multiple ones (shot) which is launched out of the end of the firearm.

How much can you save?

This is an important factor as it can severely affect the decision for reloading. Why? It has to do with a factory cost baseline of ammunition, and we’ll use cheap factory ammunition.

  • Shotgun: 12ga 2-3/4″, #7.5 lead shot. Prices are $8 per box of 25, or $0.32 per round.
  • Rifle: .223 Remington 55gr FMJ, Prices are $12 per box of 20, or $0.60 per round.
  • Rifle: .300 Winchester Magnum, 180gr SP. Prices are $30 per box of 20, or $1.50 per round.
  • Handgun: 9x19mm Parabellum, 124gr RN. Prices are $18 per box of 50, or $0.36 per round.

Lets go right to reloading costs. DISCLAIMER! The author does NOT reload for shotgun and therefore cannot comment on the direct costs associated to reloading that particular genre of shooting. Plus all prices are approximate, there may be certain brands/sales where factory ammunition is indeed cheaper than reloading, but those are few and far between in TPF’s experience…

  1. Primers are about $0.04 apiece and with moderate loads all brass can be reused for 6 reloads, with many smaller cases lasting 10, 15 or more reloads.
  2. Brass costs per reload for .223/.300/9mm, assuming 6 reloads from spent factory ammunition is $0.10/0.30/0.06 respectively.
  3. Powder costs approximately $40 per pound, which is 7000 grains of powder. Case capacity for moderate loads of .223/.300/9mm equate to 25/75/5 grains of powder per respective load or a per round cost of $0.15/0.45/0.03.
  4. Bullets are the area where costs can be significantly reduced. Typical replacement bullet costs are wholly dependent on mass and construction. in the case of the .223 Remington, 55gr FMJ bullets can be obtained for as low as $0.15 each, and for the .300 WM; aftermarket hunting bullets are roughly $35 per 100 pieces. Plated bullets for the 9mm can be found for $0.11 each.
  5. Adding up the totals for reloading. .223 Remington can be reloaded for $0.44, or a savings of $0.16 per round. .300WM for $1.14 each or a savings of $0.36 per round. With 9mm, reloading at $0.25 saves $0.11 per factory round.

These numbers are the BASIC savings, as factory ammunition quality/brand increases so do the costs per round. As an example, a high performance .300WM box of ammunition can reach $45+ per box. That jumps the costs per factory round to $2.25 each, and reloading would increase the bullet cost to closer to $0.66 each or $1.45 per reload for a resultant $0.80 saving per round…

So now that we see how much actual savings that can be had with reloading, we get into usage?

How much center-fire ammunition do you shoot annually?

Are you a hunter and if you are lucky shoot a 20-25 rounds of ammunition in a single year? Do you target shoot for fun and use up 100-200 rounds a year or do you compete and throw thousands of rounds downrange every year? This is one of the most important factors to consider if determining to get into reloading. It is a part of the return on investment, ROI, of reloading equipment. As we have already discussed the basic savings per round of reloading, you can determine your ROI. Reloading equipment is not free and what would work best for a re-loader depends on how much shooting is actually done. There are several types of reloading presses and equipment available, every single one can do what it was meant to do. Reload ammunition with the necessary components.

  1. Portable re-loader kit: A small self-contained reloading kit. Runs about $40-$75. Experienced reloading rate of about 20+ rounds per hour. Can be transported easily. Examples include Lee Loader, Lee hand press, etc…
  2. Single Stage Press: Only allows for single reloading die to be utilized at a time, therefore only one cartridge receives the associated operation at a time. Base prices range from $100 to $250. Experienced reloading rate of about 40-80+ rounds per hour. Examples include RCBS Rockchucker, Hornady LNL Classic, etc…
  3. Turret Press: Allows for multiple dies to be installed, decreasing down time and allowing for a complete round to be manufactured by indexing the dies in sequence. Faster than a single stage due to less die change outs. Base prices range from $150 to $500. Experienced reloading rate of about 60-120+ rounds per hour. Examples include Redding T-7, RCBS Turret, Lee 4-Hole Turret, etc…
  4. Progressive press: Multiple dies, multiple cases at a time. A progressive press combines multiple shell die stations with a multiple case indexing device. Much greater speeds and complexity. Base prices range from $250 to $700. Experienced reloading rate of about 150-400+ rounds per hour. Examples include Dillon 650XL, Hornady LNL-AP, Lee Load Master, RCBS Pro 2000, etc…
Cases

Component #1, the reusable case

Primers

Component #2, primer

Powder

Component #3, Powder

Bullets

Component #4, The bullet

Savings

180gr .40 S&W, 6th reload (left) vs. factory. Not as shiny but still 100% functional!

Now that you have basics to compare, you can see that what volume you shoot will have an impact on what type of reloading press you might be interested in. If you shoot 100 rounds a year, are you willing to spend $500 on a press. Even saving $0.80 per reload, this scenario would equate to over 6 years before seeing any actual savings… Yet a Lee Loader kit would have an ROI in just over 9 months. Shoot 10,000 rounds? Saving $0.11 a round adds up fast every year!

How much is your free time worth?

You have an idea of reload rates from the basic numbers given above, and even those are flexible depending on what additional options you decide on. Case feeders, electronic scales, case preparation tools, tumblers, even bullet feeders and motorized press drive units. All can contribute to changing your reloading rates. However, the next question is how much is your free time worth? Do you as a re-loader want to spend 1/2/4/8/more hours a week/month/year reloading? Is reloading a chore or a form of meditation? If time equals money, or a lack of time is the issue, one can decide that a higher production volume is worth the extra financial expenditure in the beginning. If you reload for multiple calibres, do you want multiple pre-setup presses, or just the components to interchange on a single press? These are questions you need to answer long before you even decide on the type of press you would like… However, if your time is plentiful and considered free, the author can guarantee that the majority of re-loaders want you over to help them reload…

Appreciating Reloading…

The true appreciation of reloading has several levels. One of those appreciations comes with shooting a less costly ammunition with expected results. Another is the fact that via reloading, an individual can “tune” a reload to function superbly in their firearm, by recoil, accuracy, and general performance. Tuning is not fast and can involved myriads of combinations and can be regulated down to the finest detail including brass weights and concentrically of bullets. The difference of a 100mm (4.0″) group at 100m (110 yds), versus a 12mm (0.5″) is moot to some and extremely satisfying to others. One of the final and most overlooked appreciations of reloading is the fact that you are shooting something that YOU made. Self-satisfaction of a job well done is evident when the bullet hits the target that was aimed at.

There is one small detail worth mentioning however. As most re-loaders will inform those who ask about saving money; Yes, reloading allows an individual to save money when doing a factory to reloaded round cost comparison, but reloading usually makes it likely that you will shoot MORE ammunition! “I used to shoot 1000 rounds of 9mm ammo annually prior to reloading and I saved $0.10 a round by reloading, but now I shoot 2000 rounds a year… I spend more now…”

TPF is proud to be able to present this basic reloading checklist for prospective re-loaders. However, TPF does not endorse any one reloading company, as we would hope that readers can make their own informed decisions with some research and knowing what they require. Should you decide to take the reloading plunge, Congratulations!

Promoting Shooting?

EESA_Trap

The concept that guns are bad needs to be corrected!

In Canada, more acutely in Ontario, the display and use of firearms in an entirely legal manner has under gone many years of social engineering and regulation. Gone are the decades past when you and your other high school buddies brought their .22LR rifles to school for show and tell. Gone are the years past when the schools had rifle clubs and small shooting ranges established on school property. Gone are the days of being able to show off your firearm to friends and neighbours as a source of pride and safe recreational activity.

Or is it? Some are trying to break out of that mold, such as outgoing and publicized events like the following:

TPF had the chance to attend the East Elgin Sportmen’s Association’s (EESA) 11th Annual Open House, which was held just this weekend on the 11th & 12th of June. Being TPF’s first time at EESA, it was an awesome event to see the numbers of EESA club members which helped make this event possible. Now in its 11th year of running, the EESA Open House has continually grown and helped promote shooting for exactly what it is. A fun enjoyable recreation when performed safely. Safety is always the number one priority, with having fun a very close second. TPF talked to literally dozens of people and when asked how much they were looking forwards to the day, or how they liked their time at the open house; the answers were ALWAYS with smiles and positive attitudes.

EESA_Membership

Jennifer Eichenberg has a BUSY day feilding EESA membership questions.

EESA’s current president, John Evers, is a stalwart supporter of promoting shooting and encouraging people to at least know about firearms by experiences such as that offered during the EESA Open House. While appearing to be overwhelmed by the sheer scale of organized chaos involved in running the open house, TPF talked to a few of the EESA members present and they agreed that the passion that Mr. Evers has is one of the top ten things that are required to make this sort of event successful. John’s skills and passionate disposition to firearms has him running several high profile roles including being a Regional Director for the CSSA and a successful media personality for firearms related issues. John has been quoted as saying that the EESA Open House is “The best weekend of the year for me.” At the end of day two of the event, he and his crew of volunteers are spent physically. Emotionally, they all love it as the event allows them to bring smiles to the faces of others and it is immensely satisfying to teach new shooters how to have fun with firearms in a safe environment.

Day one of the Open House was not the best in terms of weather with a small smattering of rain imposing itself, but when all was said and done, nearly 80 people were lined up at the entrance waiting for the event to open at 10:00am Saturday morning… Taking a quick tour around the facilities proved to be very enlightening. The various ranges were appropriated for various firearm groups. Indoor facilities were strictly for Handguns while the 85m range was dedicated to smallbore and air rifles. At the 100m range, dozens of firearms were available for use in some of the more popular calibres currently used by the shooting community Exotic and larger calibres, such as the incomparable .50BMG were located at the 300m range. By the end of the first day, the numbers showed that 586 people came through the gates to attend the open house.

EESA_Youth

A youth tries out a .223 rifle

EESA_New_shooter

Never shot before, a .22LR starts him off.

The second day of the open house was less wet, but was several degrees colder during the day and the wind picked up significantly. That did not discourage the multitudes of people from flocking to the gates of EESA to have their chance at shooting one or more firearms. Not surprisingly some of the most popular firearms were AR-15’s (Of which there were at least 3 at the 100m range). Add in the additional rifles chambered in .223 Remington and it was a foregone conclusion that by 3:30PM on Sunday, there was not a single un-fired round of that calibre remaining at the entirety of EESA.

EESA_100_Yard

The rack is missing over a dozen rifles being used by attendees

Just a listing of SOME of the firearm calibres that were being offered:

  • .177 Pellet, .17 HMR
  • .204 Ruger, .22 LR, .22 WMR, .22-250 Remington, .223 Remington
  • .270 Winchester, .30-30 Winchester, .308 Winchester, 7.62 x 39mm
  • .300 Winchester Magnum, .300 Weatherby Magnum, .30-06 Springfield
  • .338 Lapua, .375 H&H, .45/70 Government, .50 BMG
  • 9 x 19mm, .40 S&W, .45 ACP, .44 Remington Magnum, .50 Action Express
  • AND MORE!!! (including the tons of 12ga)
ESSA_100Yard_Lineup

The lineup at 100m, typical for the entire open house

EESA_Shotgun_Lineup

For a chance to try Trap was well attended.

EESA_85_Yard

Just a sampling of rifles available at the smallbore section

The most convincing aspect of how much people are enticed into trying these events is obvious by the line ups for the various ranges. The longest line ups were for handguns with some people waiting nearly 90 minutes to have their chance at firing a handgun for their very first time. Their was a separate line up to shoot the custom .50 BMG rifle at the 300m range and you could hear that shot clear across the length of EESA’s property. Despite a steep cost per shot there was no shortages of takers to try out the giant .50 BMG rifle with line ups usually being thirty or forty people in length.

By the end of day two the weather was thankfully cool, the volunteer’s bodies were tired and feet sore, and the sense of another great Open House at EESA was evident. Day two’s final tally posted a record 829 attendees for a weekend total of 1415 people who attended this year’s 2011 EESA Open House. What a remarkable event dedicated to getting the public to come and try shooting for the very first time and educating those who attend that the use of a firearm can be a great source of fun and recreation.

EESA_Cleanup

Littering the ground, the aftermath of the EESA Open House is purely clean up...

Update: June 14th, 2011. Total round count during the 2 day event, 63565 rounds of ammuntion. That is an average of 45 rounds of ammuntion PER attendee!

Ultrasonic Cleaners – Hornady’s case cleaning alternative!

Through the years the author has used many brands of reloading equipment, all dependent on the direct application of what was being loading for. The only constants in those reloading efforts were that a beam scale was utilized to check powder load weights and a tumbler to clean the spent brass. (TPF uses the common incorrect term of weight as “load mass” sounds very odd to nearly everyone that reloads). Today “weighing” of powder is not the topic for today, but brass cleaning is. Currently there are a multitude of methods which exist for cleaning brass; such as the following:

  • Vibratory Tumbling – Dry (Media can be corncob, walnut, ceramic pellets, etc…)
  • Rotary Tumbling – Dry or Wet (Dry media as above, or liquid based with other waterproof cleaning media such as stainless steel pins)
  • Chemical Cleaning – Wet (A common method is soaking in an acidic based solution like vinegar, warm water rinse and air dry)
  • Manual Cleaning – N/A (Polishing inside and outside via brushes, scrubbing pads, and cleaning cloths)
  • Ultrasonic Cleaning – Wet (High frequency sound waves through a liquid solution)

Out of these listed the most efficient in terms of time and efforts are the use of tumblers with dry media setups due to the level of effort required from the individual cleaning the brass. Manual cleaning is by far the cheapest solution, but also requires the greatest amount of efforts and can be nearly impossible with some smaller necked rifle calibres (imagine trying to manually clean the inner walls of a 22-250 case). In this installment of TPF we look at a specific product family from Hornady; Ultrasonic Cleaners as offered by one of the leaders of reloading companies.

SonicClean01

Hornady's Lock -N- Load Sonic Cleaner

Hornady started the launch of their ultrasonic cleaners back in the beginning of 2010 with the Lock -N- Load Sonic Cleaner. With a 0.95L (1.0 qt) capacity and a 5 level duration timer, the Sonic Cleaner can clean your volumes of spent brass to new levels with ease. Described as being able to hold 200 pieces of .223 Remington brass or 100 pieces of .308 Winchester, the Sonic Cleaner has a decently sized capacity, although many dry tumblers can hold more. The benefit to water based cleaning, is the elimination of fumes and dust particulate which can occur when dry media types are used, and the ever elusive clean primer pocket can be obtained without any consideration of media size, nor are plugged flash holes an issue.

SonicClean02

LNL Sonic Cleaner parts basket

Hornady’s marketing would have you think that the Sonic Cleaner creates “microjets” of water in the stainless steel tank which blast off the carbon, dirt and grime from the brass. The true definition of how ultrasonic cleaning works is as follows:

Ultrasonic cleaning is the rapid and complete removal of contaminants from objects by immersing them in a tank of liquid flooded with high frequency sounds waves. These non-audible sound waves create a scrubbing action within the fluid. The ultrasonic energy enters the liquid within the tank and causes the rapid formation and collapse of minute bubbles: a phenomenon known as cavitation. The bubbles, travel at high speeds around the tank causing them to implode against the surface of the item immersed in the tank in an enormous energy release, which gently lifts contamination off the surface and innermost recesses of intricately shaped parts.

100pcs308

100 pcs of .308 Win

100pcs308_03

.308 in the Sonic Cleaner

DISCLAIMER! Ultrasonic cleaning does not mean that cases will be shiny and bright in finish, just clean. If you want bright gleaming cases, you will need to either play with the contents of the liquid solution used in order to get the desired results, or perform a post dry tumbling once the cases have been dried after ultrasonic cleaning & rinsing. Hornady recommends using one tablespoon of “One Shot Sonic Clean Solution” for every quart of water and states that three full cleaning cycles (3 x 480 seconds) should get most brass clean. TPF reads this performance meter as being in regards to spent brass which is collected at the time of firing opposed to that which would be classed as range brass which has been exposed to elements and is more than likely tarnished and possibly even corroded. TPF decided to perform two tests.

Test Number One:

308 pockets prior

Primer pockets before cleaning

This consisted of 100 pieces of various headstamped .308 Winchetser range brass. This brass consists mainly of maintained reloading brass plus a dozen or so pieces of range brass in various levels of condition. All brass was deprimed prior to being immersed and subject to the cleaning process. As Hornady claims, 100 pieces of .308 does indeed fit into the basket for the cleaning tank, in fact stacked right, you could get probably 105-110 pieces. Three (3) sessions of 480 seconds (24 minutes total) were done using One-Shot Sonic Clean – Case Cartridge Solution, mixed with tap water in the ratio described on the bottle (40:1). Once the trio of cleaning cycles were completed the basket filled with brass was removed and drained into the Sonic Cleaner as best as possible and the and the brass was flushed with hot water to clean off any remaining cleaning solution.

308 pockets after

Primer pocket after 24min

The results were impressive and what was expected. Non-range brass came out extremely clean with much of the carbon removed from the primer pockets and the internals of the case. In some instances the outside of the cases had bright/shiny spots at various points on them, which TPF attributes to the vibrational forces rubbing cases together. In the case of range brass, it too was cleaned of all carbon, and as expected, basic surface discolouration and corrosion areas wer indeed cleaned of all dirt and deposits, but the visual appearance shows how the solution is not meant to make brass pretty. As evidenced by several pieces of range brass, the cleaning does NOT remove tarnish and discolouration unless it is strictly from accumulated surface grime and debris. Rusted areas are still corroded, but all loose scale and corrosion does get cleaned off the case surfaces.

308Cleaned

Internal of .308 after cleaning

308RangebrassCleaned

Range brass is physically clean even if still showing discolouration.

Test Number TWO:

SonicClean03

.40 S&W & the LNL Sonic Cleaner

Nearly 200 pieces of .40 S&W, all Speer headstamp. All brass was maintained reloading brass with no range brass included. The cleaning solution from test number one was reused and made up for with additional tap water. Unlike the previous test, all brass had not been deprimed which meant that the primer pockets would not get full cleaning action due to the cup and anvil being in place. As was done with the previous test, the brass was cleaned with three (3) sessions of 480 seconds (24 minutes total) in the Sonic Cleaner and then were rinsed with hot water. The results show how well the Lock -N- Load Sonic Cleaner removes carbon deposits left from burning powder.

40SW_Cleaned
.40 S&W after 24 minutes

TPF has added a very basic and simple video which hopefully shows the noise levels and cleaning action of Hornady’s Lock-N-Load Sonic Cleaner.

The only real drawback is similar to that of wet tumblers, rinsing and dry time for cases. In the case of ultrasonic cleaning, capacity is an issue as well and that is usually due to the mass of the cleaning solution (Water is actually quite heavy). On the topic of capacity, Hornady also has a Magnum version which triples the capacity of the Sonic Cleaner. However, that is for a separate review…

Hornady’s Lock-N-Load Sonic Cleaner does indeed get brass clean, inside and out, and while other mixtures of cleaning solutions are available on the internet, the factory solution seems to work pretty well. The LNL Sonic Cleaner has an MSRP of  $134.12 USD from Hornady, but is available at all firearm stores that stock Hornady products. The Hornady ‘One-Shot ‘ case cleaning solution makes approximately 32 batches of solution and has a MSRP of $25.00 and has availability akin to the Sonic Cleaner.

As always, TPF poses the question to our readers to make the determination for yourself:
Hornady’s Lock -N- Load Sonic Cleaner – Tactical, Practical, or Fantastical?

ATI’s Akita Adujstable Hunting Stock – One stock for all?

Advanced Technology International (ATI) has been making aftermarket accessories for many years. Especially in the market of plastic/polymer aftermarket stocks for all sorts of classic military rifles such as SKS’, Enfields, and Mosin Nagants. They also dabbled into the tactical aftermarket for shotguns with top folding stocks as well as collapsing stocks that were based on those used on AR15/M16 Carbines. Not content with the tactical aftermarket for popular shotgun brands, ATI decided to venture a product which can be used in the casual hunting market. A very much adjustable stock replacement set for common shotgun models. That product line is known as the Akita Adjustable Stock and currently are manufactured to be mounted on the following varieties of Shotguns.

  • Mossberg 500/535/590/835, 12 Gauge
  • Maverick 88, 12 Gauge
  • Winchester 1200/1300/SXP, 12 Gauge
  • Remington 870, 12 Gauge (& Norinco Clones)
  • Ithaca 37, 12 & 20 Gauge
  • CZ 712, 12 Gauge

The CZ 712 version can currently only order the adjustable butt stock portion, the other listed shotguns are covered with the basic Akita sets. However newer Mossberg’s & Mavericks (post 2006) cannot use the Akita forend due to action bars being molded into the forend tube).

The Tactical 500

Current Mossberg 500 & new 28" barrel

The Akita reviewed by TPF is Model AHS0100, which contains both buttstock and forearm and can and will be used to change-up the author’s Mossberg 500 from an old-fashioned tactical version to a more dual purpose shotgun. The current Mossberg 500 stared life as a typical 28″ version complete with wood buttstock and forend, which has for the last several years been outfitted with an older ATI set of furniture. However, all components have been kept as those at TPF are pack rats in regards to firearms related items. The only complaint the author had with the old system was that there was no adjustment for the comb of the stock. The design put the stock’s collapsing tube to such a high elevation that the author could not line up the beads with the top of the receiver. Later versions came with a wedge which allowed for the whole buttstock to be shifted downwards on assembly.

ATI_Options

Mossberg 500 internal components and barrel options (Top Half), ATI Akita Stock Set (Mid-Left), Old ATI Tactical Stock Set (Mid-Right), Original Stock Set (Bottom)

ATI_Akita1

Detail of Akita Buttstock

The common version of the Akita comes with multiple mounting components which allow for component mounting on a variety of receivers and action bars/forend. Thankfully the instructions provided with the Akita are simple and clear, so that nearly all shotgun owners should be able to do the conversion themselves. The Akita stock has a four position extendable length of pull that has a range between 315mm to 365mm (12-3/8″ to 14-3/8″) and is simply operated by pressing up on the recessed lever and pulling or pushing the tail end of the stock to one of the four desired lengths before releasing the lever to lock it into place. The buttstock itself includes a sling swivel stud and a decent looking recoil pad. Included on the rear stock is an adjustable cheek rest which has nearly 13mm (1/2″) of variation, and is modified by removal of two cover plugs and the corresponding screws underneath them (one on each side). Adjustment is done by pulling the rest backwards it unlocks the check piece from the adjustment grooves and then the piece is elevated to a more ideal height. Re-install the screws and replace the cover plugs. All done. This specific build required that the cheek piece remained at the factory preset which equates to the lowest possible elevation.

ATI_Akita2

Detail of cheek rest adjustment, shown at highest elevation

 As an individual who has had much experience mechanically and with machines, the entire process for converting to the Akita was very simple. On top of the brand adaptors for the buttstock and the additional spacers/mounts for the forend, the Akita kit also included a sheet metal key/wrench to use on the forend retaining nut. HOWEVER! There were two areas which the author can see as being problematic for the DIY individual.

  1. First was the actual mounting of the rear stock to the receiver.  In order to install the stock you need to remove the butt place/recoil pad, then remove the adjustment lock, and slide off  the back portion of the collapsing stock to expose the mounting area for the remaining front portion of the stock. Now up to this point the efforts to disassemble and prep are very simple to do. At this point a socket on an extension must be used and is less simple in trying to align, install  and torque the stock retaining bolt into the receiver. I needed to shim inside my socket to ensure the bolt did not slide back into the socket during line up and initial threading into the receiver. Second, the angle which the bolt resides during tightening is not straight and requires a very small universal or flexible extension. The author used a 1/4″ socket driver with a 6″ flex extension to install and torque the bolt. Re-assembly of the components was as simple as the initial removal.
  2. The second trouble spot was the installation of the forend components onto the action bar assembly. While installation of the rear portion of the forearm was easy, putting in the front portion required some small tapping with a hammer to ensure that the adaptor was fully seated. Not really an issue, but when everything else goes so smoothly…
Akita Mounted

Akita Adjustable Hunting Stock, Original and Older ATI Tactical comparison

The biggest concern now is that the author will need to relearn how to shoot without a pistol grip stock, but that is a challenge being looked forwards to. Since obtaining this product from ATI in the spring of 2010, some design changes have occurred. (Yes, TPF has stockpiling items for reviewing, many months in advance. Some are still waiing on a firearm to mount on…) A newer, more absorbing recoil pad has been included as part of the Akita Stock and there are over a dozen varieties of colouration/camouflage available as of the time of this posting.

The reviewed Akita Adjustable Hunting Stock/Forend Kit in black is available from Brownells at a MSRP of $159.99 USD, with the camouflage  having an MSRP of $179.99 USD. Canadian retailers like Ellwood Epps and Al Simmons are among the many Canadian gun stores where the Akita can be ordered in all options.

Advanced Technology International’s Akita Adjustable Hunting Stock – Practical, Tactical or Fanstastical?

Akita-Wood1

Original buttstock Comparison

Akita-Wood2

Original forend Comparison

ATI_Comp_Ext

Older ATI Tactical Comparison

The Showdown! – Multitasker Ultralight vs. Gerber eFECT

Ultralight vs eFECT

Multitasker's Ultralight Vs. Gerber's eFECT

It was a statistical given and was only a matter of time as TPF has given an overview of both AR-15 specific tools in the past. Multitasker’s Ultralight and Gerber’s eFECT are good tools in themselves and are both quality products. However, in this installation of TPF we will be comparing the similar features of both tools and focusing on the differences between them. We will be reviewing various categories and features and giving our opinions. GASP! That is correct, TPF will be rating both on various features and details. So without further ado, let TPF’s first showdown begin!

PHYSICAL SIZE:  The Ultralight, while narrower than the eFECT, is longer by nearly 25mm (1″) and is heavier by nearly half again.

Carbon Scraper

Carbon Scraper, Ultralight on left

TOOL ARMS: Ultralight 4, eFECT 6. However, two of the eFECT’s arms are for attachments.

  • Front sight adjustment tool. The eFECT has a switchable bit for either 4 or 5 prong AR-15 front sights, where the Ultralight only comes with a 4 prong (A2) version.
  • Carbon scraper. The Ultralight has a design which is dedicated to cleaning of the bolt from the AR platform, where the eFECT has a large, very effective scraper for any long linear areas.
  • Flat screwdriver. Both tools have a large flat tip screwdriver, the eFECT’s being mounted to have a decent reach for tight fits. The Ultralight’s version is meant more for surface usage (tightening of slotted nuts and screws for attachments). Both can double as an additional carbon scraper.
  • Attachment arms.  The eFECT has two (2) with female threads versus the single male threaded version of the Ultralight.
  • eFECT ONLY: A dedicated push pin arm.
  • Ultralight ONLY: First. Part of the screwdriver arm incorporates a butt stock castle nut wrench for field tightening of the aforementioned nut. Second, as briefly mentioned, the one arm is a dedicated 1/4″ hex bit driver.
Showdown Comparison

Screwdriver, Sight Tool, Dental Pick/Otis Attachment (eFECT on left)

LOCK MECHANISM: For each trio of arms on the Gerber, there is a spring loaded sliding lock. Simple and reusable for both sides. The Ultralight uses a combination of lock styles for each individual arm.

CONSTRUCTION: The eFECT is comprised of stainless steel sheet metal for the liners and the stamped punch and screwdriver arms. The remaining 4 arms are cast and held together between two polymer panels. The Ultralight is made from stainless steel and all major components are machined and/or wire EDM’d. The entire package is wrapped in G-10 fiberglass panels and includes a wire EDM’d pocket clip.

Sheath Showdown1

Ultralight (l) vs eFECT (r) - Sheaths

INCLUDED ACCESSORIES:

  • eFECT: A Molle compatible sheath. The reversible front sight bit and the dental pick and bristle brush for the attachment arms.
  • Ultralight: A Molle compatible sheath. The A2 sight bit, plus 10 more common bits for the 1/4″ hex driver. Only comes with the dental pick attachment, but is far more robust than that of the eFECT’s.

COST: Multitasker has an MSRP of $74.99 USD versus $79.99 USD for the Gerber eFECT.

So now we do the comparison showdown.

  1. Physical Size – eFECT wins. While the size and heft of the UL makes a more solid and secure feeling tool, the mass alone makes the eFECT the winner for a carried item.
  2. Tool Arms – Ultralight wins. The quantity of tool arms does not quite overcome the sheer robustness and versatility of the UL. The included pick on the eFECT is pitiful compared to the robust one that comes with the UL. Besides, how many OTIS connections can you use at once anyways? One. The bit driver alone puts the UL over the top in this category.
  3. Lock Mechanism – Tie. The UL has very solid locking devices for each of the four arms, but there are 3 different types. The eFECT has a lock for each set of three arms and they are identical. Simplicity versus strength results in a tie.
  4. Construction – UL from manufacturing edge. Both tools are well conceived and manufactured for light maintenance work on the AR platform, the detail to the processes used for construction goes to the UL. Both would most likely hold up to long term everyday usage, and I’m positive that people will break the UL more often due to misusing the castle nut wrench, however, the eFECT has the appearance and feel of being made as cheap as possible through the use of stampings and castings.
  5. Accessories – UL hands down. The inclusion of 10 additional driver bits (with many more customs ones being created) gives the thumbs up to the UL.
  6. Sheath – eFECT, barely… The Gerber eFect sheath is more compact and velcro closing which is good for storage and mounting comfort. The UL sheath is bulky due to the size of the tool and the accessory bits and is a snap enclosed pouch with a more rigid construction.  Comfort edges out apparent robustness.
  7. Cost – UL. Cheaper by $5 USD is pretty self explanatory.

CONCLUSION: Now if you are looking for a smaller more comfortable tool that will still do nearly everything needed for routine maintenance on your AR-15, one would be hard pressed to go wrong with the Gerber eFECT. However! The higher quality manufacturing and the apparent versatility over the eFECT coupled with a lower MRSP make the Ultralight TPF’s chosen winner.

WINNER of the first Tactical, Practical & Fantastical Showdown – Multitasker’s Ultralight

TPF's Choice!

TPF's Choice!

The Canadian Shooting Sports Association – aka CSSA

I joined the CSSA nearly 5 years ago because of a series of events beginning with a desire to find out more about guns and reloading.
Now I have owned various firearms for just over a decade. I’ve since bought firearms and resold them to other licensed individuals all across Canada. I still have my first shotgun sitting in a corner of my gun safe. That Cooey 840, single shot, break-action shotgun has actually shot more flats of 12ga than any other shotgun I have owned since, although my Mossberg 500 is soon catching up. When I bought that Cooey at my first firearm auction, I paid $12.50 for the shotgun and $25 to the government to register it. At that time I had unwittingly given up being a trusted Canadian Citizen by becoming an official firearms owner here. The path of who I am today started there…

The chain of events started in mid-2005 when I was looking for reloading data for my newest acquisition; a dedicated moose rifle chambered in .300 Winchester Magnum… Up until then I had a couple shotguns and a pair of well used .22’s. During the google searching I came across a link to a post in an online forum. That post gave me the beginnings of the reloading bug and a desire to learn even more about all the different firearms out there. That forum was Canadian Gun Nutz, aka CGN. Finding CGN turned out to be both a blessing and a curse, as I began to learn more and more about all sorts of firearms, accessories, reloading, and events, I started to realize just how little actually knew about firearms and realized how much the legislation involved in firearms ownership was geared specifically to deter people from wanting to own or possess them. During the next few months I began to learn about the political side of “gun control” and the decline of firearms owners due to the cost and confusion surrounding the firearms act brought in by 1995’s Bill C-68. It was here that I first came across the organization called the Canadian Shooting Sports Association, or CSSA for short.

In 2006 I had an opportunity to attend the SHOT Show as a guest of a friend I knew… The Shooting, Hunting and Outdoor Trade Show was like a new world to me at the time. Firearms of every shape, size, and calibre was present at the show; from pocket purse pistols, to over/under shotguns worth over $100K apiece… On a whim I decided to attend a gathering in what would become a pivotal point in my life. During the week of the SHOT Show I attended a small gathering hosted by the CSSA. There I met Tony Bernardo, the #1 pro-gun lobbyist in Canada, after talking to him and a couple of others from the CSSA who were in attendance, I joined up on the spot.

The CSSA is the arguably the best pro-firearms organization available in Canada. From their lobby efforts at all levels of Canadian government as well as on the international stage, the CSSA has done extremely well for the limited manpower, and limited finances available for them. Starting in 2000, from a merger of the Ontario Handgun Association and the Ontario Smallbore Federation, when it was deemed that an effective National Voice was required to protect and enhance the rights of the Canadian Firearms Community. Over the years I have found myself more and more in agreement with the actions and activities promoted by the CSSA and since then I have progressed through the ranks of the CSSA. I started as just a member and worked through being a Field Representative, to a Regional Director, and recently elected to the Board of Directors itself. It has been five years since that fateful meeting and since then I have done things and met people I would never have thought possible to do, all in the name of being a Pro-Firearms Advocate.

Some of the things which I have done since:
1. Traveled across the country on behalf of the CSSA, and represented firearms owners across Canada.
2. Meeting the Prime Minister of Canada. Not just once, but several times.
3. Have written and had published hundreds of letters, articles, and reviews associated to firearms.
4. Met and befriended many like-minded individuals, many of whom I would trust my life with.
5. Met the current and past presidents of the NRA, and many other firearms prominent celebrities.
6. Interviewed and conversed with many, many others I would have never otherwise dreamed of approaching, such as actor Thomas Jane (HBO’s Hung, Punisher).

In truth, since that meeting, I have become more self-confident, self-aware, and outgoing, and in my opinion, a much better person.

I love my family and friends, they are the reason I joined the CSSA and decided to volunteer much of my free time. I want my children to be able to do the following:
1. To allow them the ABILITY to use all firearms in a safe responsible manner. If firearms are inaccessible and verboten, nobody can enjoy them legally.
2. To allow them the CHOICE to use firearms if they desire. It is a choice of the individual to use firearms in a responsible manner. If they choose not to use firearms for fun, sport, sustenance, and/or defence; that is their choice. Do NOT assume make that choice for others.

It is these primarily reasons why I am in this fight to protect and enhance our rights in Canada. Help support our efforts. Join the CSSA today!

 And a ringing endorsement by Brian Lovig from the Daily Split!

Gerber Answer 3.25 – SAO with attitude!

Gerber - Answer 3.25

Gerber's Answer - SAO

Several weeks ago, TPF did a review of SOG’s Flash II.  Today a look is given to a version available from another manufacturer; Gerber Legendary Blades. Gerber’s Answer is a spring assisted opening knife, self catagorized as being a “Clip Folder” and appears to be constructed with durability in mind. Gerber SAO’s use what is trademarked as the F.A.S.T. system. From Gerber’s website; F.A.S.T. is “a proprietary name that stands for Forward Action Spring Technology: Spring assisted blade opening mechanism designed for Gerber by custom knife maker Butch Vallotton.”

Gerber - Answer 3.25's Slider

Slider in "Locked" Position

With handles crafted from black anodized aluminium, textured inserts (read skateboard tape) for additional non-slip gripping and sporting an 84mm (3.3″) nitrided stainless steel blade , the very ergonomic Answer has a substantial mass at 153gr (4.9 oz). There are only two controls on the Answer, the first being a saftey/release slider which determines the available actions of the blade. From the closed position the slider can be switched front and back with nearly zero effort. When the red dot is exposed by shifting the slider towards the pivot point, it signifies that the knife safety is disabled (red dot meaning “armed”) and is  GTG (“Good to go”) for opening. When not showing the “armed” dot, the blade is locked into position, irregardless if it is in a closed or open position. In the open position the slider forced into away from the blade pivot and must be actuated in order to release the blade for closing.

The second control is the dual thumb studs on the blade itself for ambidextrous opening which is very simple to acomplish. Use the thumb stud to manouver the blade open to a point where the F.A.S.T. mechanism takes over and locks the blade into open position. Compared to the aforementioned Flash II, the Answer’s opening speed is not as fast, but feels much more solid as it locks into open position which may be a result of not using any obvious polymer/plastics in construction of the knife. The pocket clip for the answer in NOT reversible and is located at the blade pivot, on the opposit side of the slide pivot. This means that when the Answer is clipped into your pocket, the blade pivot side sticks up (AKA Tip Down position). The EDC knife of TPF’s author sits in the same fashion, but some individuals may not desire that orientation.

Gerber - Answer 3.25 opened position

Gerber's Answer 3.25 SAO Knife

The Answer itself has few variations. The model reviewed has a drop point straight edged blade design, however, a sister model of the same blade length and mass is offered with a Tanto blade shape incorporating a partially serrated edge. Two other versions of the Answer also exist. The Answer SM is a smaller version of the model reviewed here with a 71mm (2.8″) blade and massing 81gr (2.6 oz). The Answer XL is the tanto version enlarged to a 102mm (4.0″) blade and massing a hefty 218gr (7.0 oz).

Gerber - Answer Spine view

More branding. "Gerber" on the spine

The Gerber Answer 3.25 reviewed (model# 22-01971) has a MSRP of $72.99USD and is available at a great variety of knife stores across Canada. Like SOG, Gerber allows prospective customers to purchase many (if not all ) products direct from the Gerber website.  The SM and XL versions list for MSRP’s of $63.99USD and $84.99USD respectively.

Gerber Legendary Blades: Answer 3.25 – Tactical, Practical, or Fantastical?

What a roller-coaster…. Post Election!

Well it was 6 weeks of utter chaos and lack of sleep so TPS apologizes for the delay in posting any new reviews. Helping our local Conservative Party of Canada candidate try to be re-elected for a third term. Some of the activities are as follows:

  • Hundreds and hundreds of lawn signs installed (including TWO on my front lawn)!
  • Canvassing several hundred homes across 96 km^2 (37 miles^2) of riding.
  • Dropping literature at several thousand apartments in the riding.
  • Attending several local region all-canadate debates
  • Attending several local  region campaign rallys (including 3 with the party leader, Stephen Harper, present).
  • The letters written to the various newspapers.
  • Scrutineering on election night to ensure fair & impartial accounting of the votes.

That doesn’t even include the 40 hours a week I work to earn a living, nor the dozens of hours and weekends volunteering for the CSSA during the same 6 week stretch. In the end a victory the Conservative Party of Canada. On May 2nd, 2011, for the election of Canada’s 41st Government, 14,720,580 individuals cast their votes to elect a 308 seat parliament. With 61.4% voter turnout, the CPC won 54.2% of the seats for a clear majority government.

With a majority mandate, the much discussed, heavily debated, Long-Gun Registry should be finally removed after years of promises and a multitude of attempts in a minority government. That means a WIN for the Canadian Firearms Community, and a great first step to responsible, effective firearms legislation which penalizes criminals, not those of us who are law-abiding at heart.

My MP (Member of Parliament), Harold Albrecht, defeated all challengers handily (by over 17,000 votes above either of the two major challengers). However, on what should have been his greatest day of triumph, tragedy struck. After a great leisurely day, Mr. & Mrs. Albrecht finished dinner and were preparing to attend the CPC gathering hoping for a victory party to ensue… Mrs. Albrecht, claimed a sudden severe headache and then passed into unconsciousness. 38 hours later, Mrs. Betty Albrecht passed away from spontaneous intracranial hemorrhaging, more commonly known as a brain aneurysm. When he could have been celebrating his third term elected, Harold and his family were surrounding Betty at a Hamilton hospital, praying for her.

I am sure you will understand that if I state, I would have rather lost the riding than have such events happen to such a great individual. I have only known the Albrechts for the last 5 years, and I am a better person for knowing Harold, Betty and their selfless family. Thank you Harold, for your values, commitment to family, and above all else, your unyielding devotion to your beliefs.

Betty Albrecht, 1952 – 2011Harold & Betty Albrecht

To give you an understanding of how much Betty was loved:

On Valentine’s Day in 2008, Albrecht rose in the House of Commons to pay tribute to his wife.

“While the list of those who have influenced my life and encouraged me along my journey is a long one, there is one person to whom I am most indebted and who deserves great thanks on this very special day: My wife Betty,” he said.

“I will never be able to thank Betty for her faithful commitment over the past 36 years, but today I want her to know how deeply she is loved. I am grateful that God has blessed my life with her as my best friend and wife.”

The two days of visitations had over 1200 individuals attend. At the funeral, several dozen other MP’s and their spouses attended the funeral of Betty Albrecht on their OWN volition. Plus add in Prime Minister of Canada as well as the dozen or so local politico’s (mayor’s councillors, MPP’s, etc…) should give you some idea of how well-respected and loved Harold and Betty were in the community and in Ottawa. The church holding the funeral, regularly seats 900+ people. They had stackable chairs against each other in the aisles and another room opened up downstairs to allow more people to be in attendance, to accommodate nearly 1200 people attending to pay their respects and show their love and support to the Albrecht family… Betty will be missed by many, but never forgotten.

SOG Flash II – It is quick…

In between the author’s federal party volunteer work, getting taxes complete, paying employment, and shooting hobbies, as well as family on top of that; TPF is pleased to be able to take a look at SOG’s Flash II, assisted opening knife. The model we are looking at today is the black polymer handled, drop-point, straight-edged version; specifically the FSA-8.

SOG - Flash-II

SOG’s Flash-II

SAO knives (Spring-Assisted-Opening) are perfectly legal in Canada. As has been described to the author by those with far more knife knowledge than TPF; as long as you have to mechanically or physically move the blade before the spring takes over and finishes opening the blade to full extension it is 100% good to go. Ones that do not move the blade are the automatic, and ones which you can open with the “flick of the wrist” or through centrifugal force are considered prohibited devices. So your old 1980’s lock-back knife that is loose to the point that the blade falls out of the handle when you hold it certain ways is a bad thing in Canada. Our laws make about as much sense as giving a murderer three-for-one credit for time served while waiting for trial…

SOG - Flash-II Clip

Single cap screw for reversible clip & safety lever

Back to the SOG Flash II. The knife uses the patented SAT opening mechanism (SOG Assisted Technology) for its mechanism for completing the opening once the thumb stud on the blade is engaged. It is fast and solid in operation. The model reviewed was equipped with black Zytel handles and includes a reversible pocket clip. This clip actually protrudes past the handle and allows for the knife to be carried in one’s pocket with the most minimal visual clues. As SOG states, the clip allows for “the lowest, most discreet carry possible.” TPF has to agree, and the clip is mounted to allow for minimal hand repositioning or manipulation, when withdrawing it from the pocket and opening the blade.

Now for the operation of the Flash II. Opening the blade is a two-part process. Firstly the safety must be manipulated into the unlocked position, which is denoted by a bright red indicator. This safety appears to have a detent as it does require a decent amount of effort to shift and there is a noticeable mechanical “unlock/lock” when used. The safety was included as an additional measure to prevent unwanted blade opening, which sounds like a CYA statement to TPF. The opening of the blade is accomplished only through the use of the blade mounted thumb studs mounted on opposite side of the blade itself. For closing of the blade, the pivoting stud located in the handles is pulled back and unlocks the blade, allowing for closing. This pivoting stud is easy to use and allows for one-handed closing by using the thumb to unlock the blade and then pressing the back of the blade against any object, such as a pant leg, and into the closed position.

SOG - Flash-II

The most basic version of the Flash II

Both the safety lock and the blade release are located on the same side of the knife, the only true issue with the knife is if you reverse put the pocket clip. Manipulation of the safety looks as though it would become much more difficult due to how close the clip sits to the safety lever. The 89mm (3.5″) stainless steel, straight blade is housed in the encompassing and surprisingly comfortable and firm grips. At 97 grams (3.1 oz) this knife masses very light for its size due to the thorough use of Zytel.

SOG Specialty Knives and Tools has numerous variations available for this knife including tanto shaped blades, black TiNi coatings, partially serrated edges and numerous colour options for the handle similar to the SOGZilla reviewed earlier by TPF. Also available is an aluminum machined handle version which increases the Flash II’s mass to 131 grams (4.2 oz), and a rescue version which has a serrated sheep’s foot contoured blade with a black or orange Zytel handle.

The SOG Flash II reviewed (FSA-8) has a MSRP of $75.00 USD and is available at a great variety of knife stores across Canada. SOG’s website can help prospective buyers to decide on the option they like best and even purchase it direct, but be aware that shipping costs may be unbelievably high. Most versions of the Flash II have MSRP’s under $90 with the exception of a few select configurations which top out at nearly $145.00 USD.

SOG Specialty Knives and Tools’ Flash II – Tactical, Practical, or Fantastical?